Tutorials

Monday 30 August 2021

“Adore you!” 49 and Market Single page layout

Hi there Creative Friends!


Izabella, my sister’s little granddaughter is such a precious little thing! She loves dressing up and have her picture taken. This is one of my favourite pictures of her with her lovely pink flower headband and those big brown eyes. 


For this layout I used the natural tones of a combination of the Vintage Artistry Naturals and Essentials collections. I added color with elements of the Blush Rub-on Transfers, flowers, watercolor paint and Distress Ink. I wanted to capture the softness of the moment.


Adore You!


To create the background of the layout I used Vintage Artistry: Wallflower as the basis and framed it with Vintage Artistry Everyday: Garden Variety. I trimmed the Wallflower paper to 11,5” x 11,5”and distressed the edges. I adhered it to the Garden Variety paper. I splashed and painted with watercolor paint and distress ink and also added rub-on transfers to add more color and interest.


I chalked the edges of the background frame with distress ink to create more contrast and added more pink rub-on transfers.


There is a butterfly on the paper on the left side and I added green foliage, pink flowers and a butterfly also from the foliage pack as an embellishment collage. 


I raised the photo with cardboard and placed it on layers of tabbed frames. The sentiments on the tabs are rub-on transfers, as well as the doily. The small hearts are taken from Wishing Bubbles and Baubles: Blush. 


The stitching on the photo is a rub-on transfer from Roughly Sewn Rub-ons in Black. You can also see a little gauze peeping out, as another layer behind the photo.


The main embellishment cluster is created with flowers, foliage, ribbon, Guiney Fowl feathers Blush and Wishing Bubbles. And that is how a neutral layout turned into a very pink layout in the end!


Thank you so much for stopping by, I hope you found a little inspiration here!


Hugs


Ezz x


I used the following 49 and Market products:

Vintage Artistry: Wallflower

Vintage Artistry Natural Laser-cut elements

Vintage Artistry Rub-on Transfers: Blush and Sage

Wishing Bubbles and Baubles: Blush

Vintage Artistry Essentials: 3x4 File Frame

Vintage Artistry Essentials: Foliage

Flowers: Garden Petals: Ballet Slipper

Flower Mini-series: Punch

Roughly Sewn Rub-ons in Black


Other products used:


Gathered Twiggs Distress Ink

Metal photo fasteners

Watercolor paint

Guiney fowl feathers

Ribbon

Heart pins

Sunday 15 August 2021

“Friends” 49 and Market Single page layout

Hi there dear Creatives!


August is Woman’s Month here in South Africa with 9 August Woman’s Day, a public holiday. This is when we focus on strong inspirational woman, who we look up to, are inspired by and also just love because we are all woman! Yellow has always been a challenge for me, I do not why, so I decided to push my boundaries a bit with this layout and used the Vintage Artistry Butter collection. 


I love this photo of my friends; they are very special to me and the yellow in the photograph convinced me to go big on the yellow! I hope you like it.


Friends


I used the Mellow and Sachet to create my background. I trimmed the Mellow paper to 11,5” x 11,5”and distressed. And punch a bit with a scalloped punch. To pick up on the swirls in the paper, I stenciled with gold paste and added Rub-on Transfers and color (Faded Jeans Distress Ink) to create depth. I tore the paper two thirds down horizontally and “inserted” the 2 lace strips, overlapping one another.


I normally do not use this photo size, but I wanted the frame from the laser cut sheet as an accent on top of the photograph. I raised it with foam tape and layer almost everything on the two laser cut sheets behind the photograph to create a layered look.


On the left side I created an embellishment collage with the clock, flowers and camera. Some elements are raised with foam-tape. The chip-board title fits perfectly below it all.


By now I was totally into the buttery warm yellow! On the righthand side I went wild with flowers and butterflies! I think I got quite carried away!


When I stood back and admired my handy work, I couldn’t believe I had such a thing about yellow! Although it is a very busy layout, I am happy with the outcome.


And that is it!  Thank you so much for stopping by, I hope you found a little inspiration here!


Hugs


Ezz x


I used the following 49 and Market products:

Vintage Artistry Butter-Mellow

Vintage Artistry Butter-Sachet

Vintage Artistry Butter-12x12 Collection Pack

Vintage Artistry Essentials-Foliage

Vintage Artistry Butter-Lilac Rub-on Transfers

Royal Spray Sunshine- Paper Flowers


Other products used:

         Faded Jeans Distress Ink

         Chipboard title

White die cut leaves

Swirl stencil

Gold Paste Paint

Friday 30 July 2021

"Right Here" - 49 and Market


Hi there dear Creative Friends!


I think we all miss the special times with loved ones, family and friends. Covid has restricted movements and getting together with those dear to us. I really miss spending time with my daughter. We took these silly pictures before Covid when we went to a rose farm to pick our own roses. We also had a scrumptious lunch there of course. What a special memory! 


For this layout I chose the Vintage Artistry Everyday Collection, I love the natural colors and of course it goes with any theme.


Let me take you through the process of creating this layout:


I used the Zealous and Convivial to create my background. I trimmed the Zealous paper to 11,5” x 11,5”and distressed. And punch the bottom side with a scalloped punch. I chose the Zealous sheet because I wanted to create my own unique paper for the background as I really love the 49 and Market Transfer Rub-ons. I also added some color with water color paint. 


To compliment the punched border, I added a lace strip from the die cut sheet.


If you look closely, you will also notice a little stamping in brown ink.


The photos are layered on elements from the laser cut sheets and the Ephemera pack with a piece of gauze at the bottom. I created flower and chipboard clusters at the top and the bottom of the photo focal point. 


A closer look of the bottom flower cluster. The sentiment on the circle is also from the laser cut sheet and I used it as the title of the page.


I painted all the chipboard leaves with Champagne All Purpose Ink, I also add a bit to the flowers and splatter over the complete layout! It is difficult to see on a photo but it looks great in real life.


A closer look of my favorite Guiney Fowl feathers!


And that is it! 


Thank you so much for stopping by, I hope you found a little inspiration here!


Lots of creative hugs for you!


Ezz

x


I used the following 49 and Market products:

Vintage Artistry Everyday 12x12 Collection Pack (laser cuts)

https://www.49andmarket.com/product/vintage-artistry-everyday-12x12-collection-pack/

Vintage Artistry Everyday: Convivial

https://www.49andmarket.com/product/vintage-artistry-everyday-convivial/

Vintage Artistry Everyday: Zealous

https://www.49andmarket.com/product/vintage-artistry-everyday-zealous/

Vintage Artistry Everyday Ephemera Stack

https://www.49andmarket.com/product/vintage-artistry-everyday-ephemera-stack/

Vintage Artistry Everyday Rub-ons

https://www.49andmarket.com/product/vintage-artistry-everyday-rub-ons/

Royal Spray: Olive Paper Flowers

https://www.49andmarket.com/product/royal-spray-olive-paper-flowers/

Always Together Stamp Set

https://www.49andmarket.com/product/always-together-stamp-set/


Other products used:

        Pink Watercolor Paint

        Chipboard Leaves

All Purpose Ink: Champagne

Guiney Fowl Feathers

Gauze

Brown ink to stamp with

Sunday 25 July 2021

Cricut Iron-on Vinyl vs Permanent Vinyl on upcycled glass bottles

Hi there Creative Friends!

have  been playing around with the Cricut Permanent Vinyl and the Iron-on vinyl on recycled glass bottles to see which of the 2 mediums works best on up-cycled glass bottles. 


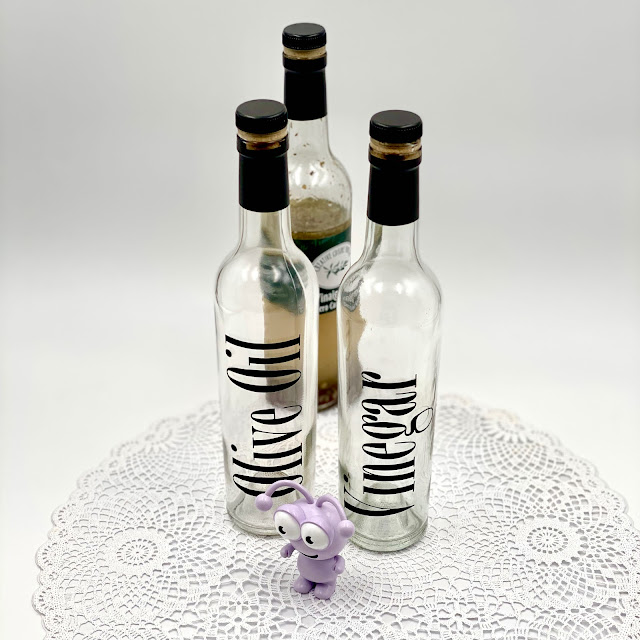
Olive Oil and Vinegar Set

Cricut Permanent Holographic Vinyl on up-cycled glass bottles as party favours!


The text for both projects were created in Design Space. I chose the Bordeaux Com Font. I quite like that font. 

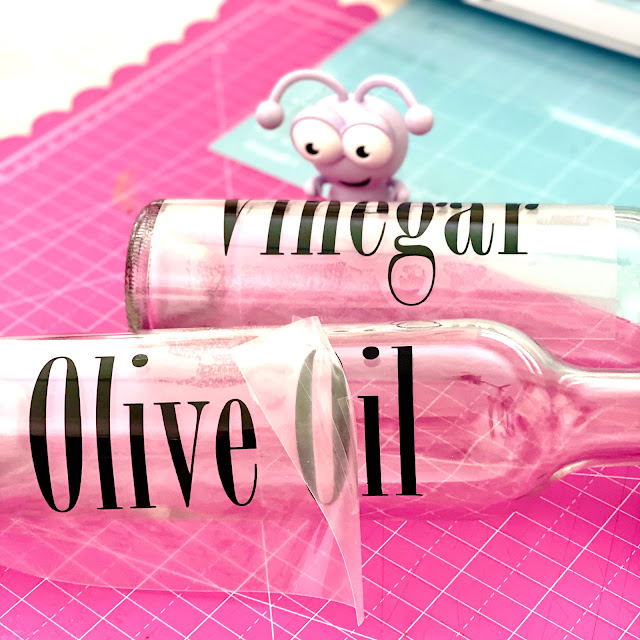
The Iron-on vinyl words were cut out with "mirror" switched on.


Weeding the vinyl is an absolute pleasure with the Cricut weeding tool. Cricut really think of everything to make a crafter's life easy.

My text was weeded in no time under the watchful eye of my Cricut Cutie!


I secured the words on the bottles with heat-tape. If you don't, the words may move and leave a shadow, and spoil your project.


I used a small heat press to iron the letters onto the glass. I thought I may struggle because of the curvature of the glass bottle, but it was fast and easy.


I gently pulled the plastic away and the results were amazing! Perfect and so professional. I'm so proud of my creation!


The permanent vinyl names for the glass bottles were designed in the same way but not cut with the "mirror" switch on. For this project I chose the "Adreena Script Demo" font. I transferred the words to the bottles using the Cricut Transfer Tape, fast and easy!

To conclude: 

Both results were perfect. Time will tell how it will respond to being handled and washed. I will have to report back after some time.

The Iron-on vinyl is obviously meant for surfaces that can handle the heat, like fabric, caps, shoes, leather, maybe books, etc. The permanent vinyl works well on hard, non-poreus and shiny surfaces. 

In the mean time, I have 8 very happy party goers, and I have 2 old salad dressing bottles converted into a Olive Oil and Vinegar set for my patio table! What a pleasure!

I hope this leaves you inspired to experiment with different kinds of vinylk. Feel free to leave a comment below or share your projects. I would love to see what you make with your Cricut!

Hugs
Ezme


Monday 19 July 2021

Creative Play with Cricut and Iron-on Vinyl

Hi there Creative Friends and "Cricuteers"!

I'm sure you have been wondering what I was up to after I received my Cricut Explore Air 2 and the amazing box full of Cricut stuff!

Well, it has been interesting to say the least. I was immediately intrigued by the "Iron-on Vinyl" and started to customise all my husbands T-shirts with "Mr. H"! (To his amusement). I wanted to test the waters as I have not done any of it before. 

I was used to the software of a different brand of cutting machine and it took a bit of time to get used to Design Space. But Design Space is very easy to negotiate your way around and in no time I created my images that I wanted to iron onto my husbands T-shirts. I played around with the font, stretched it, and moved it around, just having fun with the software. 

(The alignment is a little out, I blame it on being too excited!)


There are so many Fonts to choose from, I think I spend at least an half an hour selecting the font! Eventually I decided on this one: "Decorate 035 Std Regular". I thought it complimented the "Mr. H" feel! What do you think?


It is important to remember to cut the mirror image of whatever you are going to iron onto the T-shirt. When you choose the material the software reminds you to cut the mirror image. A very good feature because if you are like me, you might forget to tick that block in the heat of the excitement!


You can use an ordinary iron to transfer the image to the T-shirt if you don't have a heat press, and you can get all the settings on Cricut website. It is super easy! I had some epic fails too, more about that later! very important is to use a lint roller to lift dust an lint particles from the fabric before you iron the design on. Also invest in some heat tape to keep the design in place or you will definitely have "ghosting". That is when the design moves slightly and creates a little shadow. This could ruin your project.

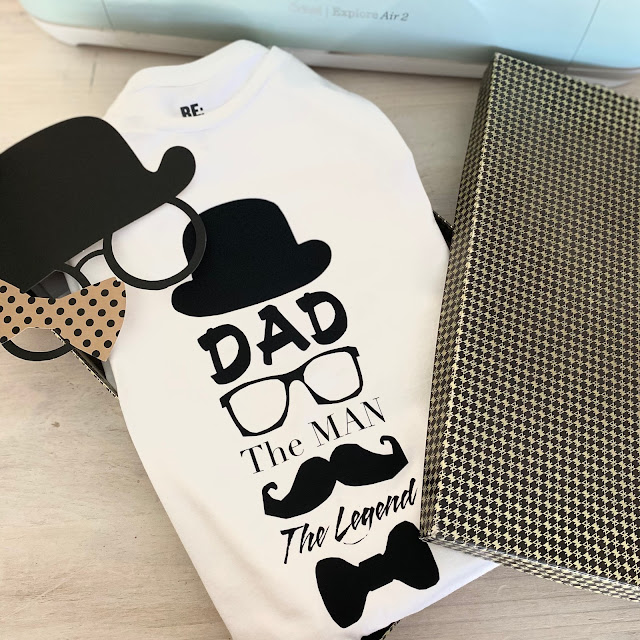
My husbands's birthday normally falls close to "Fathers Day", so I created this T-shirt for him. He loves it! 


Here is a little video of this process. Enjoy.


And if you get stuck, help is near! Just contact "Cricut Member Care"!


The Cricut Iron-On was super easy to use. And I was really surprised at the beautiful and professional finish. I could barely belief I did it myself.

I will regularly share my Cricut projects here and on Social Media. I hope you will share my Cricut creative journey with me. 

Feel free to comment or ask questions. I will try to answer or refer you if I can't.

Till next time, happy creative play!

Ezmé