Hi there!
I’m so excited to share my first Little Birdie Design Team Project with you!
I designed a single scrapbook layout for my first project. A dear friend of mine recently had a birthday and this photo of her and her daughter was just perfect for it.
“Celebrate”

Let’s start!


I chose paper from the Cottage Lace Collection to layer on white card-stock. I used the Lace paper as background and trimmed it 0,5” smaller. I fussy-cut the flowers from Wood-Plank paper and trimmed a piece of the wood paper to 4,5” x 6,5” . I tore along the right vertical side for interest.
Step 2


Then I distressed all the edges and made two small tears in the top right-hand corner of the Lace paper. I placed the paper pieces and cotton lace as in the picture above and adhered with the Little Birdie Acrylic Soft Gel Medium to the background.
Tip: If you do not have a distress tool, you can also use a small pair of sharp scissors.
Step 3


The background was the first splattered with the Golden Glaze, thinned with water and a flair paint-brush, and then Mixed Media Paste was randomly stenciled on the background with the "Spotty" stencil.
Tip: Remember to wash your stencils immediately to get rid of the left over paste.
Step 4


I decided to paint the chipboard frame and word with the “Golden Glaze” Tinted Metallic Paint. Although Little Birdie Chipboard is primed already, I wanted to make sure the Golden Glaze stand out, so I painted the chipboard with a thin layer Mixed Media Paste. It is a Gesso and modeling paste all in one.
Tip: Thin the Mixed Media Paste with a little water to apply easier.
Step 5
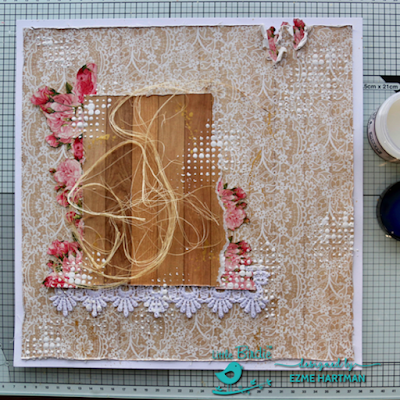

To create additional dimension and interest, I used Little Birdie Sisal Fiber and adhered it to the area where the photograph will be placed. Again I used Little Birdie Acrylic Soft Gel Medium.
Step 6


I layered the photograph with the gold painted frame on the front and a piece of Little Birdie Cheese Cloth at the back. Then I created clusters of flowers with the Little Birdie Boutique Elements, the roses, small flowers and leaves.
Tip: To get more depth, I raised the photograph with thin cardboard.
Step 7


The Little Birdie Crystal Drops are perfect to accentuate and add interest. I used the Little Birdie Gel Medium to adhere them. The Gel Medium dries clear and matt.
Step 8


The small painted chipboard word was adhered with Gel Medium in the right-hand corner, across the lace trim.
Step 9


The layout was finish the layout off with a small bow I made from Sisal Fiber and adhered it to the main flower cluster.
Here is some more close up photographs of the out:


I hope this leaves you inspired to create.
Thank you so much for stopping by!
Ezmé


I hope this leaves you inspired to create.
Thank you so much for stopping by!
Ezmé
I used the following Little Birdie supplies for this single page layout:
· Cottage Lace 12x12 Paper Collection
· Sisal Fiber
· Cheese cloth
· Primed Chipboard – Birthday Wish
· Primed Chipboard – Frame
· Boutique Elements – Pearl Pink beaded flowers
· Boutique Elements – Fiona Pearl pink roses
· Crystal Drops
· “Spotty” Stencil
· Mixed Media Paste
· Acrylic Soft Gel
· Tinted metallic Paint – Golden Glaze
No comments:
Post a Comment